Difference between revisions of "Paper"
From College of Art and Design IT Wiki
| Line 2: | Line 2: | ||
<li>Make sure that the printer wheels are locked (the brake lever is pressed down) to prevent the printer from moving.</li> | <li>Make sure that the printer wheels are locked (the brake lever is pressed down) to prevent the printer from moving.</li> | ||
<li>Release the spindle lock on the right-hand side.</li> | <li>Release the spindle lock on the right-hand side.</li> | ||
| − | <li>Remove the first end of the spindle from the right-hand side of the printer, and then move the spindle to the right in order to extract the other end. Do not insert your fingers into the spindle supports during the removal process. | + | <li>Remove the first end of the spindle from the right-hand side of the printer, and then move the spindle to the right in order to extract the other end. Do not insert your fingers into the spindle supports during the removal process. |
Figure 1: Removing the spindle from the printer | Figure 1: Removing the spindle from the printer | ||
| Line 8: | Line 8: | ||
[[File:RemoveSpindle.png]] | [[File:RemoveSpindle.png]] | ||
| − | The spindle has a hub at each end to keep the roll in position. Remove the blue hub at the left end to mount a new roll. The hub slides along the spindle to hold rolls of different widths. | + | The spindle has a hub at each end to keep the roll in position. Remove the blue hub at the left end to mount a new roll. The hub slides along the spindle to hold rolls of different widths.</li> |
| − | <li>Slide the lever-lock on the blue hub to the unlocked position and remove the hub (1) from the left end of the spindle. | + | <li>Slide the lever-lock on the blue hub to the unlocked position and remove the hub (1) from the left end of the spindle. |
Figure 2: Removing the hub from the spindle | Figure 2: Removing the hub from the spindle | ||
[[File:RemoveHubFromSpindle.png]] | [[File:RemoveHubFromSpindle.png]] | ||
| − | + | </li> | |
| − | <li>Rest the roll of paper that you want to load on the loading table. The roll might be long and heavy, and you might need two people to handle it. | + | <li>Rest the roll of paper that you want to load on the loading table. The roll might be long and heavy, and you might need two people to handle it. |
Figure 3: Rest the roll on the loading table | Figure 3: Rest the roll on the loading table | ||
[[File:RestRollOnLoadingTable.png]] | [[File:RestRollOnLoadingTable.png]] | ||
| − | + | </li> | |
| − | <li>Slide the spindle into the roll. Make sure that no space exists between the roll and the fixed hub at the right end of the spindle. | + | <li>Slide the spindle into the roll. Make sure that no space exists between the roll and the fixed hub at the right end of the spindle. |
Figure 4: Sliding the roll onto the spindle | Figure 4: Sliding the roll onto the spindle | ||
[[File:SlideRollOntoSpindle.png]] | [[File:SlideRollOntoSpindle.png]] | ||
| − | + | ||
Make sure that the paper will wind off the roll in the correct direction. If it does not, remove the spindle from the roll, turn the roll 180° and rest it on the loading table. Then slide the spindle into the roll. | Make sure that the paper will wind off the roll in the correct direction. If it does not, remove the spindle from the roll, turn the roll 180° and rest it on the loading table. Then slide the spindle into the roll. | ||
NOTE: A label on the spindle also shows the correct winding direction. | NOTE: A label on the spindle also shows the correct winding direction. | ||
| Line 33: | Line 33: | ||
[[File:CorrectRollDirection.png]] | [[File:CorrectRollDirection.png]] | ||
| − | + | </li> | |
| − | <li>Put the blue hub on to the upper end of the spindle, and push it towards the end of the roll as shown in step 1 in the following image. Then slide the lever-lock to the locked position as shown in step 2. | + | <li>Put the blue hub on to the upper end of the spindle, and push it towards the end of the roll as shown in step 1 in the following image. Then slide the lever-lock to the locked position as shown in step 2. |
Figure 6: Placing the hub on the spindle | Figure 6: Placing the hub on the spindle | ||
[[File:PlaceHubOnSpindle.png]] | [[File:PlaceHubOnSpindle.png]] | ||
| − | + | </li> | |
| − | <li>With the blue hub on the left, insert the spindle into the left side of the printer (1), and then into the right side of the printer (2). | + | <li>With the blue hub on the left, insert the spindle into the left side of the printer (1), and then into the right side of the printer (2). |
Figure 7: Fitting the spindle into the printer | Figure 7: Fitting the spindle into the printer | ||
[[File:FitSpindleIntoPrinter.png]] | [[File:FitSpindleIntoPrinter.png]] | ||
| − | + | </li> | |
<li>Close the spindle lock on the right-hand side. | <li>Close the spindle lock on the right-hand side. | ||
If you regularly use different paper types, you can change rolls more quickly if you pre-load rolls of different paper types on different spindles.</li> | If you regularly use different paper types, you can change rolls more quickly if you pre-load rolls of different paper types on different spindles.</li> | ||
| − | <li>At the printer's front panel, select the [[File:Page.png]] icon, and then select Paper load > Load roll. | + | <li>At the printer's front panel, select the [[File:Page.png]] icon, and then select Paper load > Load roll. |
Figure 8: Front panel load roll message | Figure 8: Front panel load roll message | ||
| Line 55: | Line 55: | ||
Alternatively, you can start loading paper without using the front panel, by feeding paper in or lifting the pinch lever when there is no paper loaded. | Alternatively, you can start loading paper without using the front panel, by feeding paper in or lifting the pinch lever when there is no paper loaded. | ||
| − | NOTE: If you lift the pinch lever, you will need to align the paper manually; follow the instructions on the front panel. | + | NOTE: If you lift the pinch lever, you will need to align the paper manually; follow the instructions on the front panel.</li> |
<li>If printing paper info is disabled, the front panel asks you to select the paper type.</li> | <li>If printing paper info is disabled, the front panel asks you to select the paper type.</li> | ||
<li>The front panel asks you to feed paper. When the printer detects the paper, paper checks will begin.</li> | <li>The front panel asks you to feed paper. When the printer detects the paper, paper checks will begin.</li> | ||
| − | <li>If the paper that you are using has a paper-data barcode printed on the leading edge of the roll, and printing paper info is enabled, the printer automatically reads the information. If printing paper info is disabled, the barcode is ignored. | + | <li>If the paper that you are using has a paper-data barcode printed on the leading edge of the roll, and printing paper info is enabled, the printer automatically reads the information. If printing paper info is disabled, the barcode is ignored. |
Figure 9: Paper-data barcode | Figure 9: Paper-data barcode | ||
[[File:PaperDataBarcode.png]] | [[File:PaperDataBarcode.png]] | ||
| − | + | ||
If printing paper info is enabled and no barcode is detected on the roll that is being loaded, the front panel asks you to enter the paper type and the length of the roll you are loading. Select the paper category and paper type of the roll. | If printing paper info is enabled and no barcode is detected on the roll that is being loaded, the front panel asks you to enter the paper type and the length of the roll you are loading. Select the paper category and paper type of the roll. | ||
| Line 75: | Line 75: | ||
[[File:PaperLengths.png]] | [[File:PaperLengths.png]] | ||
| − | + | </li> | |
<li>If some of the paper checks failed, the front panel explains the problem and helps you to load paper successfully.</li> | <li>If some of the paper checks failed, the front panel explains the problem and helps you to load paper successfully.</li> | ||
| − | <li>If you have a take-up reel (a standard feature on the 1.5m printer and an optional accessory on the 1.1m printer), a message will appear on the front panel asking if you want to load paper onto the take-up reel. If you select No (or if you do not have a take-up reel) the front panel displays the Ready message and the printer is ready to print. If you select Yes, a message will appear on the front panel asking if you want to load the take-up reel now or during printing. | + | <li>If you have a take-up reel (a standard feature on the 1.5m printer and an optional accessory on the 1.1m printer), a message will appear on the front panel asking if you want to load paper onto the take-up reel. If you select No (or if you do not have a take-up reel) the front panel displays the Ready message and the printer is ready to print. If you select Yes, a message will appear on the front panel asking if you want to load the take-up reel now or during printing. |
| − | |||
Figure 12: load the take-up reel now or during printing | Figure 12: load the take-up reel now or during printing | ||
| Line 86: | Line 85: | ||
• If you want to load the take-up reel now, select Load take-up reel now, read through the introductory text in the section Use the take-up reel, and then continue to step 3 of the procedure. | • If you want to load the take-up reel now, select Load take-up reel now, read through the introductory text in the section Use the take-up reel, and then continue to step 3 of the procedure. | ||
• If you want to load the take-up reel during printing, select Load it during printing, read through the introductory text in the section Use the take-up reel, and then continue to step 3 of the procedure. | • If you want to load the take-up reel during printing, select Load it during printing, read through the introductory text in the section Use the take-up reel, and then continue to step 3 of the procedure. | ||
| − | NOTE: Familiarize yourself with the procedural steps, because loading the take-up reel while printing requires you to complete the procedure while the printer is feeding and printing paper. Loading the take-up reel during printing saves approximately 1 m of paper. | + | NOTE: Familiarize yourself with the procedural steps, because loading the take-up reel while printing requires you to complete the procedure while the printer is feeding and printing paper. Loading the take-up reel during printing saves approximately 1 m of paper.</li> |
| + | </ol></ul> | ||
Revision as of 18:09, 31 October 2017
- Make sure that the printer wheels are locked (the brake lever is pressed down) to prevent the printer from moving.
- Release the spindle lock on the right-hand side.
- Remove the first end of the spindle from the right-hand side of the printer, and then move the spindle to the right in order to extract the other end. Do not insert your fingers into the spindle supports during the removal process.
Figure 1: Removing the spindle from the printer
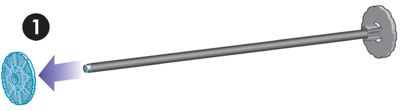
 The spindle has a hub at each end to keep the roll in position. Remove the blue hub at the left end to mount a new roll. The hub slides along the spindle to hold rolls of different widths.
- Slide the lever-lock on the blue hub to the unlocked position and remove the hub (1) from the left end of the spindle.
Figure 2: Removing the hub from the spindle
- Rest the roll of paper that you want to load on the loading table. The roll might be long and heavy, and you might need two people to handle it.
Figure 3: Rest the roll on the loading table

- Slide the spindle into the roll. Make sure that no space exists between the roll and the fixed hub at the right end of the spindle.
Figure 4: Sliding the roll onto the spindle
 Make sure that the paper will wind off the roll in the correct direction. If it does not, remove the spindle from the roll, turn the roll 180° and rest it on the loading table. Then slide the spindle into the roll.
NOTE: A label on the spindle also shows the correct winding direction.
Figure 5: The correct roll winding direction

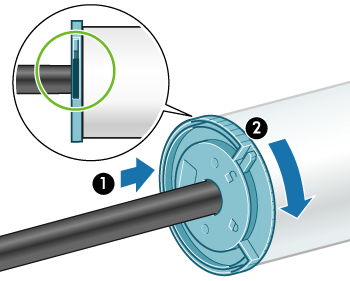
- Put the blue hub on to the upper end of the spindle, and push it towards the end of the roll as shown in step 1 in the following image. Then slide the lever-lock to the locked position as shown in step 2.
Figure 6: Placing the hub on the spindle
- With the blue hub on the left, insert the spindle into the left side of the printer (1), and then into the right side of the printer (2).
Figure 7: Fitting the spindle into the printer

- Close the spindle lock on the right-hand side. If you regularly use different paper types, you can change rolls more quickly if you pre-load rolls of different paper types on different spindles.
- At the printer's front panel, select the
 icon, and then select Paper load > Load roll.
Figure 8: Front panel load roll message
 Alternatively, you can start loading paper without using the front panel, by feeding paper in or lifting the pinch lever when there is no paper loaded.
NOTE: If you lift the pinch lever, you will need to align the paper manually; follow the instructions on the front panel.
- If printing paper info is disabled, the front panel asks you to select the paper type.
- The front panel asks you to feed paper. When the printer detects the paper, paper checks will begin.
- If the paper that you are using has a paper-data barcode printed on the leading edge of the roll, and printing paper info is enabled, the printer automatically reads the information. If printing paper info is disabled, the barcode is ignored.
Figure 9: Paper-data barcode
 If printing paper info is enabled and no barcode is detected on the roll that is being loaded, the front panel asks you to enter the paper type and the length of the roll you are loading. Select the paper category and paper type of the roll.
Figure 10: Paper categories
 Select the length of the roll.
Figure 11: Paper lengths

- If some of the paper checks failed, the front panel explains the problem and helps you to load paper successfully.
- If you have a take-up reel (a standard feature on the 1.5m printer and an optional accessory on the 1.1m printer), a message will appear on the front panel asking if you want to load paper onto the take-up reel. If you select No (or if you do not have a take-up reel) the front panel displays the Ready message and the printer is ready to print. If you select Yes, a message will appear on the front panel asking if you want to load the take-up reel now or during printing.
Figure 12: load the take-up reel now or during printing
 • If you want to load the take-up reel now, select Load take-up reel now, read through the introductory text in the section Use the take-up reel, and then continue to step 3 of the procedure.
• If you want to load the take-up reel during printing, select Load it during printing, read through the introductory text in the section Use the take-up reel, and then continue to step 3 of the procedure.
NOTE: Familiarize yourself with the procedural steps, because loading the take-up reel while printing requires you to complete the procedure while the printer is feeding and printing paper. Loading the take-up reel during printing saves approximately 1 m of paper.


